CDP and LLDP configuration 1
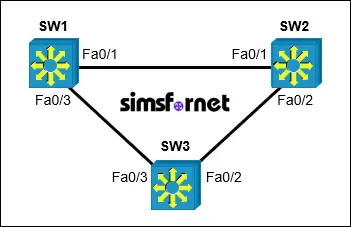
Topology
Tasks:
A company has a small network with three switches (SW1, SW2, and SW3) interconnected to form a network core. The network administrators want to ensure that all switches can discover each other’s device information. They need to use Cisco Discovery Protocol (CDP) within the Cisco network and configure Link Layer Discovery Protocol (LLDP) to discover any non-Cisco devices that may be connected in the future.
- Enable CDP and Verify Neighbor Information
- Enable CDP globally on each switch.
- Verify that each switch can discover its neighboring switches using CDP.
- Enable LLDP and Verify Neighbor Information
- Enable LLDP globally on each switch.
- Verify that each switch can discover its neighboring switches using LLDP.
- Disable CDP and LLDP on Specific Interfaces
- Disable CDP on FastEthernet0/1 on SW1 and FastEthernet0/3 on SW3.
- Disable LLDP on FastEthernet0/2 on SW2.
Solution:
Task 1: Enable
CDP and Verify Neighbor Information
- Enable CDP globally on each
switch.
- Verify that each switch can
discover its neighboring switches using CDP.
On SW1:
SW1#configure
terminal
SW1(config)#cdp run
SW1(config)#exit
On SW2:
SW2#configure
terminal
SW2(config)#cdp run
SW2(config)#exit
On SW3:
SW3#configure
terminal
SW3(config)#cdp run
SW3(config)#exit
The cdp run command enables CDP globally on
each switch. This allows the switches to discover and share information about
directly connected Cisco devices.
After enabling CDP
on each switch, we will verify that each switch can detect its neighbors.
On SW1:
SW1#show cdp
neighbors
Output:
Capability Codes: R - Router, T -
Trans Bridge, B - Source Route Bridge
S - Switch, H - Host, I -
IGMP, r - Repeater, P - Phone
Device ID Local Intrfce Holdtme
Capability Platform Port ID
SW3 Fas 0/3 145 3560 Fas 0/3
SW2 Fas 0/1 145 3560 Fas 0/1
On SW2:
SW2#show cdp
neighbors
Output:
Capability Codes: R - Router, T -
Trans Bridge, B - Source Route Bridge
S - Switch, H - Host, I -
IGMP, r - Repeater, P - Phone
Device ID Local Intrfce Holdtme
Capability Platform Port ID
SW1 Fas 0/1 145 3560 Fas 0/1
SW3 Fas 0/2 145 3560 Fas 0/2
On SW3:
SW2#show cdp
neighbors
Output:
Capability Codes: R - Router, T -
Trans Bridge, B - Source Route Bridge
S - Switch, H - Host, I -
IGMP, r - Repeater, P - Phone
Device ID Local Intrfce Holdtme
Capability Platform Port ID
SW1 Fas 0/3 145 3560 Fas 0/3
SW2 Fas 0/2 145 3560 Fas 0/2
The show cdp neighbors command provides information on
directly connected Cisco devices, including device ID, local interface, hold
time, capability, platform, and port ID. This confirms that CDP is functioning
correctly.
Task 2: Enable
LLDP and Verify Neighbor Information
- Enable LLDP globally on each
switch.
- Verify that each switch can
discover its neighboring switches using LLDP.
First we enable LLDP
on all switches.
On SW1:
SW1(config)#lldp run
SW1(config)#exit
On SW2:
SW2(config)#lldp run
SW2(config)#exit
On SW3:
SW3(config)#lldp run
SW3(config)#exit
The lldp run command enables LLDP globally on
each switch. LLDP is a vendor-neutral protocol used to discover information
about directly connected devices, even if they are non-Cisco devices.
After enabling LLDP,
verify that each switch can detect its neighbors.
On SW1:
SW1#show lldp
neighbors
Output:
Capability codes:
(R) Router, (B) Bridge, (T) Telephone, (C) DOCSIS Cable Device
(W) WLAN Access Point, (P) Repeater, (S) Station, (O) Other
Device ID Local Intf
Hold-time Capability Port ID
SW2 Fa0/1 120 R Fa0/1
SW3 Fa0/3 120 R Fa0/3
On SW2:
SW2#show lldp
neighbors
Output:
Capability codes:
(R) Router, (B) Bridge, (T) Telephone, (C) DOCSIS Cable Device
(W) WLAN Access Point, (P) Repeater, (S) Station, (O) Other
Device ID Local Intf
Hold-time Capability Port ID
SW1 Fa0/1 120 R Fa0/1
SW3 Fa0/2 120 R Fa0/2
On SW3:
SW2#show lldp
neighbors
Output:
Capability codes:
(R) Router, (B) Bridge, (T) Telephone, (C) DOCSIS Cable Device
(W) WLAN Access Point, (P) Repeater, (S) Station, (O) Other
Device ID Local Intf
Hold-time Capability Port ID
SW2 Fa0/2 120 R Fa0/2
SW1 Fa0/3 120 R Fa0/3
The show lldp neighbors command provides information on
directly connected devices using LLDP. This confirms that LLDP is functioning
correctly.
Task 3: Disable
CDP and LLDP on Specific Interfaces
- Disable CDP on FastEthernet0/1 on
SW1 and FastEthernet0/3 on SW3.
- Disable LLDP on FastEthernet0/2
on SW2.
First we will
disable CDP on required interfaces.
On SW1:
SW1#configure
terminal
SW1(config)#interface f0/1
SW1(config-if)#no cdp enable
On SW3:
SW3#configure
terminal
SW3(config)#interface f0/3
SW3(config-if)#no cdp enable
The no cdp enable command disables CDP on the
specified interface. This means CDP will not advertise or receive neighbor
information on that particular port.
Next we will disable
LLDP on the FastEthernet0/2 interface of SW2.
On SW2:
SW2#configure
terminal
SW2(config)#interface f0/2
SW2(config-if)#no lldp transmit
SW2(config-if)#no lldp receive
The no lldp transmit command disables LLDP
transmission on the interface, and no lldp receive disables LLDP reception on the interface. Together, these commands
effectively disable LLDP on Ethernet0/2 of SW2.
Now exit the
configuration mode and save the configuration.
SW1(config-if)#end
SW1#write memory
SW2(config-if)#end
SW2#write memory
SW3(config-if)#end
SW3#write memory
Packet Tracer File
Clicking this button will begin the download of a ZIP file. Inside the ZIP file, you'll find a Packet Tracer Activity (.pka) file, which will automatically track your progress as you configure the network.