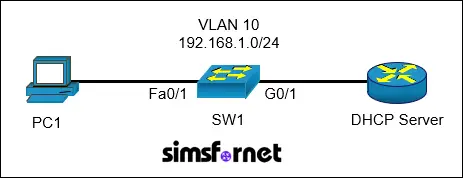
DHCP Snooping 1
Topology

Tasks:
IP connectivity is established. The DHCP server is fully configured and inaccessible. Configure DHCP snooping on SW1 as follows:
- Enable DHCP Snooping on VLAN 10.
- Enable MAC-Address verification for DHCP snooping.
- Disable data insertion to prevent DHCP relay agent information from being added.
- Configure the trusted interface.
- Verify the configuration by allowing PC1 to receive IP address from the DHCP server.
Solution:
Task 1: Enable DHCP
Snooping on VLAN 10.
SW1#configure
terminal
SW1(config)#ip dhcp snooping
SW1(config)#ip dhcp snooping vlan 10
ip dhcp snooping: Activates DHCP Snooping globally on
the switch.
ip dhcp snooping vlan 10: Enables DHCP Snooping specifically
for VLAN 10.
Task 2: Enable
MAC-Address verification for DHCP snooping.
SW1(config)#ip dhcp
snooping verify mac-address
This ensures that
the source MAC address in DHCP packets matches the client’s MAC address
recorded in the binding table.
Task 3: Disable data
insertion to prevent DHCP relay agent information from being added.
DHCP option-82 adds
additional information to the DHCP request packets before forwarding them to
the DHCP server.
SW1(config)#no ip
dhcp snooping information option
This prevents the
insertion of DHCP Option-82 relay agent information in DHCP packets to enhance
security.
Task 4: Configure
the trusted interface.
A trusted interface
in DHCP snooping is the uplink interface which is connected to or leads to the
known DHCP server. By marking the interface as trusted, DHCP responses will be
allowed through this port.
SW1(config)#interface
GigabitEthernet0/1
SW1(config-if)#ip dhcp snooping trust
SW1(config-if)#end
Task 5: Verify the
configuration by allowing PC1 to obtain a valid IP address from the DHCP
server.
PC1 should have a
link-local address configured by default. We need to renew the IP
configuration.
PC1:\>ipconfig /renew
IP Address.................:
192.168.1.2
Subnet Mask................:
255.255.255.0
Default Gateway............:
192.168.1.1
DNS Server.................:
192.168.1.1
Now exit
configuration mode and save the configuration.
SW1(config)#end
SW1#write memory
Packet Tracer File
Clicking this button will begin the download of a ZIP file. Inside the ZIP file, you'll find a Packet Tracer Activity (.pka) file, which will automatically track your progress as you configure the network.

