ACL Config 1
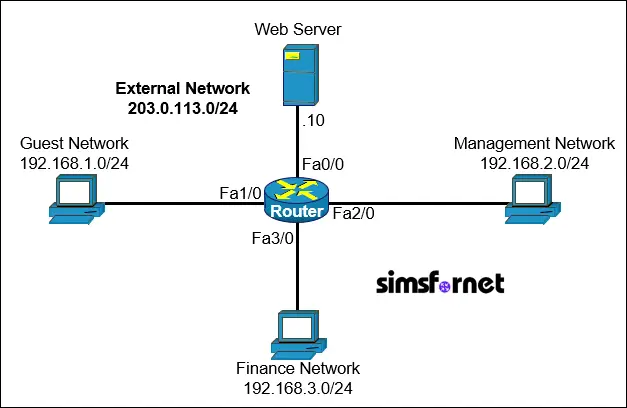
Topology

Tasks:
IP connectivity is established. A company wants to secure its internal network by restricting access to certain parts of the network based on IP addresses and protocols.
- Create a single NACL named INT_ACL on Router
- Allow only HTTP and HTTPS traffic from the Guest Network to the Web Server.
- Allow all traffic from the Management Network to the Web Server.
- Deny SSH and Telnet traffic from the Finance Network to the Web Server but allow all other traffic.
- Block all other traffic to the Web Server only.
- Apply the Access List to the appropriate Interface
Solution:
Task 1: Create a single NACL named INT_ACL on
Router.
Router#configure
terminal
Router(config)#ip access-list extended INT_ACL
This access list
will be applied to Router to filter traffic to the Web Server.
Task 2: Allow only
HTTP and HTTPS traffic from the Guest Network to the Web Server.
Permit HTTP (port
80) and HTTPS (port 443) traffic. To block traffic to a specific host or
endpoint, we need to use host wildcard mask (0.0.0.0) or keyword "host
" with the IP address of the Web server as the destination address.
Router(config-ext-nacl)#permit
tcp 192.168.1.0 0.0.0.255 host 203.0.113.10 eq 80
Router(config-ext-nacl)#permit tcp 192.168.1.0 0.0.0.255 host 203.0.113.10 eq
443
permit tcp
192.168.1.0 0.0.0.255 host 203.0.113.10 eq 80: Allows HTTP (port 80) traffic from the Guest Network
(192.168.1.0/24) to the Web Server (203.0.112.10).
permit tcp
192.168.1.0 0.0.0.255 host 203.0.113.10 eq 443: Allows HTTPS (port 443) traffic from
the Guest Network (192.168.1.0/24) to the Web Server (203.0.112.10).
Task 3: Allow all
traffic from the Management Network to the Web Server.
Router(config-ext-nacl)#permit
ip 192.168.2.0 0.0.0.255 host 203.0.113.10
This allows all IP
traffic from the Management Network (192.168.2.0/24) to the Web Server
(203.0.112.10).
Task 4: Deny SSH and
Telnet traffic from the Finance Network to the Web Server but allow all other
traffic.
Block SSH (port 22)
and Telnet (port 23) traffic from the Finance Network to the Public Server.
Router(config-ext-nacl)#deny
tcp 192.168.3.0 0.0.0.255 host 203.0.113.10 eq 22
Router(config-ext-nacl)#deny tcp 192.168.3.0 0.0.0.255 host 203.0.113.10 eq 23
Router(config-ext-nacl)#permit ip 192.168.3.0 0.0.0.255 host 203.0.113.10
deny tcp 192.168.3.0
0.0.0.255 host 203.0.113.10 eq 22: Blocks SSH traffic from the Finance Network (192.168.3.0/24) to the Web
Server (203.0.112.10).
deny tcp 192.168.3.0
0.0.0.255 host 203.0.113.10 eq 23: Blocks Telnet traffic from the Finance Network (192.168.3.0/24) to the
Web Server (203.0.112.10).
permit ip
192.168.3.0 0.0.0.255 host 203.0.113.10: Allows all other traffic from the Finance Network.
Task 5: Block all
other traffic to the Web Server.
Router(config-ext-nacl)#deny ip any
host 203.0.113.10
This blocks all
other traffic destined for the Web Server (203.0.112.10).
While the implicit
deny at the end of the ACL would block all other traffic, It is generally not a
good practice to rely on the implicit deny. A separate explicit deny entry is
added for:
· If additional rules are added
after the existing configuration, they will precede the implicit deny but
follow the explicit deny.
· The explicit deny ensures a
stricter control point for the task.
· The explicit deny entry improves
the readability and intent clarity of the ACL.
· It makes it clear to the network
administrator that blocking "all other traffic to the server" was an
intentional and specific requirement, rather than relying on the implicit deny.
This explicit deny ensures that the configuration aligns with the task
requirements and provides additional visibility into blocked traffic.
Task 6: Apply the Access List to the appropriate Interface.
We will apply the access list outbound on the FastEthernet0/0 interface
connected to the Web Server.
Router(config-ext-nacl)#exit
Router(config)#interface
FastEthernet0/0
Router(config-if)#ip access-group
INT_ACL out
Router(config-if)#exit
ip access-group
INT_ACL out: Applies the access list to outgoing traffic on the interface. This will
ensure that only the traffic permitted to the Web Server is allowed to go out
of the interface.
Verification:
Verify by pinging Web Server from PC1, the ping should fail.
C:\>ping
203.0.113.10
Pinging 203.0.113.10
with 32 bytes of data:
Reply from
192.168.1.1: Destination host unreachable.
Reply from 192.168.1.1: Destination host unreachable.
Reply from 192.168.1.1: Destination host unreachable.
Reply from 192.168.1.1: Destination host unreachable.
Now ping from PC2, it should be successful.
C:\>ping
203.0.113.10
Pinging 203.0.113.10
with 32 bytes of data:
Request times out.
Reply from 203.0.113.10: bytes=32 time<1ms TTL=127
Reply from 203.0.113.10: bytes=32 time<1ms TTL=127
Reply from 203.0.113.10: bytes=32 time<1ms TTL=127
Now Telnet from PC3, this should fail.
C:\>telnet
203.0.113.10
Trying 203.0.113.10 ...
% Connection timed out; remote host not responding.
This error means that PC3 isn't able to reach Web Server via telnet.
Now exit configuration mode and save the configuration.
Router(config)#end
Router#write memory
Packet Tracer File
Clicking this button will begin the download of a ZIP file. Inside the ZIP file, you'll find a Packet Tracer Activity (.pka) file, which will automatically track your progress as you configure the network.


