
OSPF Configuration 1
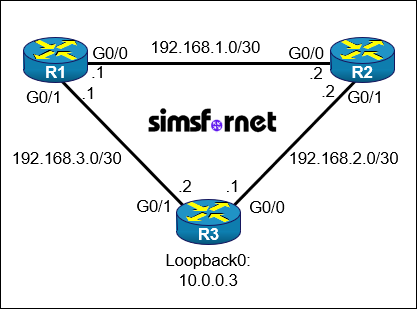
Topology
Tasks:
Connectivity between three routers has been established. OSPF must be configured using process-id 1 in the order presented to complete the implementation. No static or other dynamic routing protocols are included.
- Configure R1 and R2 router IDs using the interface IP addresses from the link that is shared between them.
- Configure R3 router ID using it's loopback0 IP address.
- Configure OSPF with process ID 1 on the routers to form neighbor relationships with each other in area 0 without using the network command.
- Configure OSPF on router R3 to advertise its loopback0 address in OSPF Area 0.
Solution:
Task 1: Configure R1
and R2 router IDs using the interface IP addresses from the link that is shared
between them.
On R1:
R1#configure
terminal
R1(config)#router ospf 1
R1(config-router)#router-id 192.168.1.1
This command
manually configures the router-id of R1 as 192.168.1.1, which is the IP address
of the GigabitEthernet0/0 interface of R1.
On R2:
R2#configure
terminal
R2(config)#router ospf 1
R2(config-router)#router-id 192.168.1.2
This command
manually configures the router-id of R1 as 192.168.1.2, which is the IP address
of the GigabitEthernet0/0 interface of R2.
Task 2: Configure
R3's router ID using it's loopback0 IP address.
On R3:
R3#configure
terminal
R3(config)#router ospf 1
R3(config-router)#router-id 10.0.0.3
This command
manually configures the router-id of R3 as 10.0.0.3, which is the IP address of
the loopback0 interface of R2.
Task 3: Configure
OSPF on the routers to form neighbor relationships with each other in area 0
without using the network command.
Instead of the network command, ip ospf area command can be used under each
interface.
On R1:
R1(config-router)#interface
range g0/0-1
R1(config-if)#ip ospf 1 area 0
On R2:
R2(config-router)#interface
range g0/0-1
R2(config-if)#ip ospf 1 area 0
On R3:
R3(config-router)#interface
range g0/0-1
R3(config-if)#ip ospf 1 area 0
The interface range f0/1-3 command allows us to configure the interfaces
collectively which can save a lot of time. ip ospf 1 area 0 command allows the interfaces to
participate in OSPF by sending and receiving OSPF Hello packets to form
neighbor relationships and advertise the directly connected network.
Task 4: Configure
OSPF on router R3 to advertise its loopback0 address in OSPF Area 0 without
using the network command.
We can configure R3
to advertise it's loopback0 address by enabling OSPF on the loopback0
interface.
On R3:
R3(config-if)#interface
loopback0
R3(config-if)#ip ospf 1 area 0
Verification:
Check the neighbour
adjacencies by using show ip ospf neighbor command on any of the devices.
R1(config-if)end
R1#show ip ospf neighbor
Neighbor ID Pri
State Dead Time Address Interface
192.168.1.2 1
FULL/DR 00:00:32 192.168.1.2 GigabitEthernet0/0
10.0.0.3 1
FULL/BDR 00:00:37 192.168.3.2 GigabitEthernet0/1
Check the Routing
table to see if there is a route to R3's loopback0 address.
R1#show ip route ospf
10.0.0.0/32 is subnetted, 1 subnets
O
10.0.0.3 [110/2] via 192.168.3.2, 00:02:12, GigabitEthernet0/1
192.168.2.0/30 is subnetted, 1 subnets
O
192.168.2.0 [110/2] via 192.168.3.2, 00:02:12, GigabitEthernet0/1
[110/2] via 192.168.1.2,
00:02:12, GigabitEthernet0/0
Now exit the
configuration mode and save the configuration.
R1#write memory
R2(config)#end
R2#write memory
R3(config)#end
R3#write memory
Packet Tracer File
Clicking this button will begin the download of a ZIP file. Inside the ZIP file, you'll find a Packet Tracer Activity (.pka) file, which will automatically track your progress as you configure the network.